
- Which tests make up the SAI Khelo India Fitness Test for classes 1-3 and for classes 4-12, and which fitness component each one measures
- The purpose, equipment, procedure and scoring of every test item, with a labelled figure for most of them
- How to calculate BMI, the Harvard Step Test fitness index and the Basal Metabolic Rate (BMR), with worked examples
- The six items of the Rikli and Jones Senior Citizen Fitness Test, the two-minute step test, and how to read the normal-range tables
- The four stunts of the Johnson-Metheny Test of Motor Educability, its marked mat and its scoring
In the CBSE Physical Education (048) curriculum this is Unit 6: Test and Measurement in Sports, worth 8 marks in the 70-mark theory paper. It also feeds the practical: Practical-1 is fitness test administration (SAI Khelo India Test). The prescribed book is CBSE’s own Physical Education Class XII textbook (2nd edition, 2022); there is no NCERT book for this subject. In the 2026-27 sample paper, a 5-mark question asks for the list of Johnson-Metheny items and the procedure of jumping half-turns and full-turns.
1 Three Words to Know First
Before any test is given, three ideas from the book’s “Do you know” box decide whether its result can be trusted.
Test protocol is the correct procedure for carrying out a test. If a test is done incorrectly, it might affect the results.
A test is valid if it measures what it sets out to measure. Example: a test for upper body strength should not measure leg strength.
Motor fitness refers to the neuromuscular components of fitness, which enable a person to perform successfully at a particular motor skill, game or activity. It is sometimes called skill-related fitness.
1.1 The six components of motor fitness
Agility
changing direction quickly
Balance
keeping the body steady
Coordination
body parts working together
Power
strength used quickly
Reaction time
how fast one responds to a signal
Speed
covering distance fast
The six cards are the specific motor fitness components the book lists. The short meaning under each name is our own one-line help.
A test is the tool or task used to collect information (for example, the 50 m dash). Measurement is recording the result as a number (8.2 seconds). Evaluation is judging what the number means (good, average or poor) by comparing it with norms. This unit itself does not define these three words; they are given here only because the unit’s title uses them.
2 SAI Khelo India Fitness Test in School
Fitness is the ability to perform physical activity, and it covers a wide range of abilities. Every sport needs its own set of skills, so being fit for one activity or sport does not necessarily make a person fit for another. That is why fitness is divided into components, and each component is tested and trained separately.
- Schools carry out the test with the Khelo India Fitness Assessment App and see the results on the School Dashboard of the School Interface.
- The programme is run by CBSE with the Sports Authority of India (SAI) under the FIT INDIA mission. The book prints a CBSE circular (Acad-25/2021, 19.03.2021) on a “Whole School Approach to Fitness”, under which PE teachers are trained to register their schools and conduct the assessments on the app.
2.1 The battery of tests
A battery is a set of tests given together. The Khelo India battery is different for two age groups.
Age group 5-8 years (Class 1 to 3)
- Children should first acquire Fundamental Movement Skills (FMS), the building blocks for games, dance and sport. Learning specific activities is left to later stages.
- Locomotor, manipulative and body management abilities are key.
- Tests: 1. Body Composition (BMI), 2. Coordination (Plate Tapping), 3. Balance (Flamingo Balance)
Age group 9-18+ years (Class 4 to 12)
- Students need overall physical fitness; these components make up the Physical Health and Fitness Profile.
- Tests: 1. Body Composition (BMI), 2. Strength: (a) abdominal, Partial Curl-up; (b) muscular endurance, Push-ups for boys, Modified Push-ups for girls, 3. Flexibility (Sit and Reach), 4. Cardiovascular Endurance (600 m Run/Walk), 5. Speed (50 m Dash)
| Fitness component | Test item | Class 1-3 | Class 4-12 |
|---|---|---|---|
| Body composition | BMI | ✔ | ✔ |
| Coordination (speed and coordination of limbs) | Plate Tapping Test | ✔ | |
| Balance (static) | Flamingo Balance Test | ✔ | |
| Abdominal strength and endurance | Partial Curl-up | ✔ | |
| Upper body strength endurance | Push-ups (boys) / Modified Push-ups (girls) | ✔ | |
| Flexibility (lower back, hamstrings) | Sit and Reach Test | ✔ | |
| Cardiovascular endurance | 600 m Run/Walk | ✔ | |
| Speed (acceleration) | 50 m Dash (standing start) | ✔ |
BMI is the only test common to both age groups. The book’s case study asks exactly this. Remember it as “3 tests for the little ones (BMI, plate tapping, flamingo); BMI plus 5 for the rest”.
3 Tests for Class 1 to 3 (Age 5-8 Years)
3.1 Body Mass Index (BMI)
Body composition refers primarily to the distribution of muscle and fat in the body. Body size, such as height, lengths and girths, is also grouped under this component.
| Purpose | To assess body composition. |
|---|---|
| Equipment | Flat and clean surface, weighing machine, stadiometer or measuring tape pasted on a wall. |
| Measuring height |
|
| Measuring weight |
|
| Scoring | BMI is calculated from weight (W, in kg) and height (H, in metres). A higher score usually indicates a higher level of body fat. |

Q. A Class 3 student weighs 25.1 kg and is 125.0 cm tall. Find the BMI.
Given: W = 25.1 kg; H = 125.0 cm = 1.25 m.
Step 1: H × H = 1.25 × 1.25 = 1.5625
Step 2: BMI = 25.1 ÷ 1.5625 = 16.1 kg/m² (rounded to one decimal).
Q. A Class 12 student weighs 52.0 kg and is 162.0 cm tall. Find the BMI.
Given: W = 52.0 kg; H = 1.62 m.
H × H = 1.62 × 1.62 = 2.6244; BMI = 52.0 ÷ 2.6244 = 19.8 kg/m².
Putting the height in centimetres. 52 ÷ (162 × 162) gives 0.002, which is meaningless. Always convert height to metres first.
The book gives no BMI norms. For adults, the World Health Organization’s categories are commonly used: under 18.5 underweight; 18.5 to 24.9 normal; 25 to 29.9 overweight; 30 and above obese. For children and teenagers, BMI is judged against age-and-gender charts instead, so these adult cut-offs should not be applied to them.
3.2 Plate Tapping Test
| Purpose | Tests speed and coordination of limb movement. |
|---|---|
| Equipment | Table (adjustable height), 2 yellow discs (20 cm diameter), a rectangle (30 × 20 cm), stopwatch. |
| Procedure |
|
| Scoring | The time taken to complete 25 cycles is recorded. Less time = better. |

3.3 Flamingo Balance Test
| Purpose | Ability to balance successfully on a single leg. It assesses the strength of the leg, pelvic and trunk muscles as well as static balance. |
|---|---|
| Equipment | Non-slippery even surface, stopwatch; it can be done standing on a beam. |
| Procedure |
|
| Scoring | The total number of falls (loss of balance) in 60 seconds is recorded. If there are more than 15 falls in the first 30 seconds, the test is terminated. Fewer falls = better. |

4 Tests for Class 4 to 12 (Age 9-18+ Years)
BMI is taken exactly as in section 3.1. The other five items follow.
4.1 Abdominal Strength: Partial Curl-up
| Purpose | Measures abdominal muscular strength and endurance of the abdominals and hip flexors, which are important in back support and core stability. |
|---|---|
| Equipment | Flat, clean, cushioned surface with two parallel strips 6 inches apart; stopwatch; recording sheets; pen. |
| Procedure |
|
| Scoring | The maximum number of curl-ups in 30 seconds. |

4.2 Muscular Endurance: Push-ups (Boys) and Modified Push-ups (Girls)
| Purpose | Upper body strength endurance and trunk stability. |
|---|---|
| Equipment | Flat, clean, cushioned surface or gym mat. |
| Procedure |
|
| Scoring | The number of correctly completed push-ups. |

4.3 Flexibility: Sit and Reach Test
| Purpose | A common measure of flexibility, specifically of the lower back and hamstring muscles. Tightness here is linked with lumbar lordosis, forward pelvic tilt and lower back pain. |
|---|---|
| Equipment | Sit and reach box: sides 12″ × 12″, front and back 12″ × 10″, top 12″ × 21″. The top panel is marked in cm and mm, and the vertical plane where the feet rest must be exactly at the 23 cm mark. Flat, clean cushioned surface or gym mats. |
| Procedure |
|
| Scoring | The distance reached by the hand (difference between the initial and final position), in cm and mm. |

4.4 Cardiovascular Endurance: 600 m Run/Walk
| Purpose | Cardiovascular fitness / cardiovascular endurance. |
|---|---|
| Equipment | Stopwatch, whistle, marker cone, lime powder, measuring tape; a 200 m or 400 m track with lanes 1.22 m wide (minimum 1 m), preferably on a flat, even playground, with starting and finish lines marked. |
| Procedure |
|
| Scoring | Time taken to complete the run or walk, in minutes and seconds. |
4.5 Speed: 50 m Dash (Standing Start)
| Purpose | Determines acceleration and speed. |
|---|---|
| Equipment | Measuring tape or marked track, stopwatch, cone markers, a flat clear surface of at least 60 metres. |
| Procedure |
|
| Scoring | Time taken to complete 50 m. |
Mixing up the two track tests. The 600 m run/walk tests cardiovascular endurance and walking is allowed. The 50 m dash tests speed and acceleration, from a standing (dead) start. The book’s own MCQ: the 50 m dash tests acceleration, not endurance.
4.6 General instructions before testing
Clothes
Comfortable, loose-fitting sportswear during the test.
Food
Food at least 3 hours before testing; plenty of fluids in the 24 hours before; no alcohol or caffeine for 24 hours.
Rest
Proper rest and sleep the night before; no strenuous exercise on the day of the tests.
Warm up and cool down
Proper warm-up before and cooling-down after the testing.
Equipment
Calibrated, organised, sterilised and tested before the test.
Administration
Temperature not too hot, cold or humid; stationery ready; students told the procedure; consent taken well in advance.
5 Measuring Cardiovascular Fitness: Harvard Step Test
The Harvard Step Test was developed by Brouha in 1943 to measure physical fitness for work and the ability to recover from work. It was originally designed for young men of college age; in the original validation Brouha tested 2200 males.
| Purpose | To determine aerobic fitness. |
|---|---|
| Objective | To perform the step test continuously, without a break, for 5 minutes or until exhausted. |
| Equipment | Bench or wooden block 20 inches high; stopwatch; metronome. |
| Procedure |
|
| Scoring | Fitness Index score, from the short formula below. |

| Fitness Index | Rating |
|---|---|
| Up to 49 | Poor |
| 50-80 | Average |
| 81 or above | Good |
Norms reference given in the book: Dr. D. K. Kansal (2008), Textbook of Applied Measurement, Evaluation and Sports Selection.
Q. A student completes the full 5 minutes. The pulse count between 1 and 1½ minutes after exercise is 55. Find the fitness index and rating.
Duration = 5 × 60 = 300 s.
FI = (300 × 100) ÷ (5.5 × 55) = 30000 ÷ 302.5 = 99.2 → Good (81 or above).
Q. Another student cannot keep the pace and stops after 3 minutes. The pulse count is 70. Find the fitness index and rating.
Duration = 3 × 60 = 180 s.
FI = (180 × 100) ÷ (5.5 × 70) = 18000 ÷ 385 = 46.8 → Poor (up to 49).
Q. A student finishes 5 minutes with a pulse count of 75. Rating?
FI = 30000 ÷ (5.5 × 75) = 30000 ÷ 412.5 = 72.7 → Average (50-80).
“20 – 30 – 5 – 5.5”: bench 20 inches, 30 steps a minute, 5 minutes, divide by 5.5. A lower pulse after exercise means faster recovery and a higher fitness index.
The curriculum’s learning outcome mentions finding the fitness index “through Harvard Step Test / Rockport Test”, but the book describes only the Harvard Step Test. The Rockport One-Mile Walk Test is another aerobic fitness test: the person walks one mile (about 1.6 km) as fast as possible, and the time taken and the heart rate at the end are put into an equation to estimate aerobic capacity (VO₂ max). Like the Harvard Step Test and the 6-minute walk, it is a test of aerobic endurance.
6 Computing Basal Metabolic Rate (BMR)
Basal Metabolic Rate (BMR) is the number of calories needed to maintain body function in a resting condition: the calories burnt by the body while performing basic life-sustaining functions. Its unit is the kilocalorie (Kcal).
A person who does no work at all still needs energy for the working of the internal organs; that energy is the BMR.
Changes in the environment, such as heat and cold, may also change the body’s requirement.
| Purpose | To determine Basal Metabolic Rate. |
|---|---|
| Equipment | Stadiometer, weighing machine, pen and paper. |
| Procedure | Height and weight are measured exactly as for BMI (section 3.1); age is noted in years. |
| Formula used | The Mifflin-St Jeor BMR equation. |
Q. Find the BMR of a 17-year-old boy who weighs 60 kg and is 170 cm tall.
10 × 60 = 600; 6.25 × 170 = 1062.5; 5 × 17 = 85.
BMR = 600 + 1062.5 − 85 + 5 = 1582.5 Kcal.
Q. Find the BMR of a 16-year-old girl who weighs 50 kg and is 158 cm tall.
10 × 50 = 500; 6.25 × 158 = 987.5; 5 × 16 = 80.
BMR = 500 + 987.5 − 80 − 161 = 1246.5 Kcal.
| Point | BMI | BMR |
|---|---|---|
| Full form | Body Mass Index | Basal Metabolic Rate |
| Tells us | Body composition (higher = usually more body fat) | Calories needed at rest |
| Data needed | Weight, height | Weight, height, age, gender |
| Height in | metres | centimetres |
| Unit | kg/m² | Kcal |
Writing “Body Mass” for BMR. BMR = Basal Metabolic Rate; BMI = Body Mass Index. A name is never needed to compute BMR, but age and gender are.
7 Rikli and Jones Senior Citizen Fitness Test
The Senior Citizen Fitness Test (SFT) was developed by Rikli and Jones for older people aged 60 to 94 years.
- Purpose: to evaluate functional ability, monitor the physical fitness status of older people, identify problems and work on the weaknesses.
- It is economical and easy to administer.
- It should not be taken by those with medical conditions like chest pain, dizziness, high blood pressure or heart problems.
| No. | Test item | Measures | Score |
|---|---|---|---|
| 1 | 30-second Chair Stand Test | Lower body strength | Stands in 30 s |
| 2 | Arm Curl Test | Upper body strength | Curls in 30 s |
| 3 | Chair Sit and Reach Test | Lower body flexibility | Inches, + or − |
| 4 | Back Scratch Test | Upper body flexibility | Inches, + or − |
| 5 | Eight Foot Up and Go Test | Agility (physical mobility) | Seconds, best of 2 |
| 6 | Six Minute Walk Test | Aerobic endurance | Distance in 6 min |
| Alt. | Two Minute Step Test | Aerobic endurance | Right-knee lifts in 2 min |
7.1 30-Second Chair Stand Test
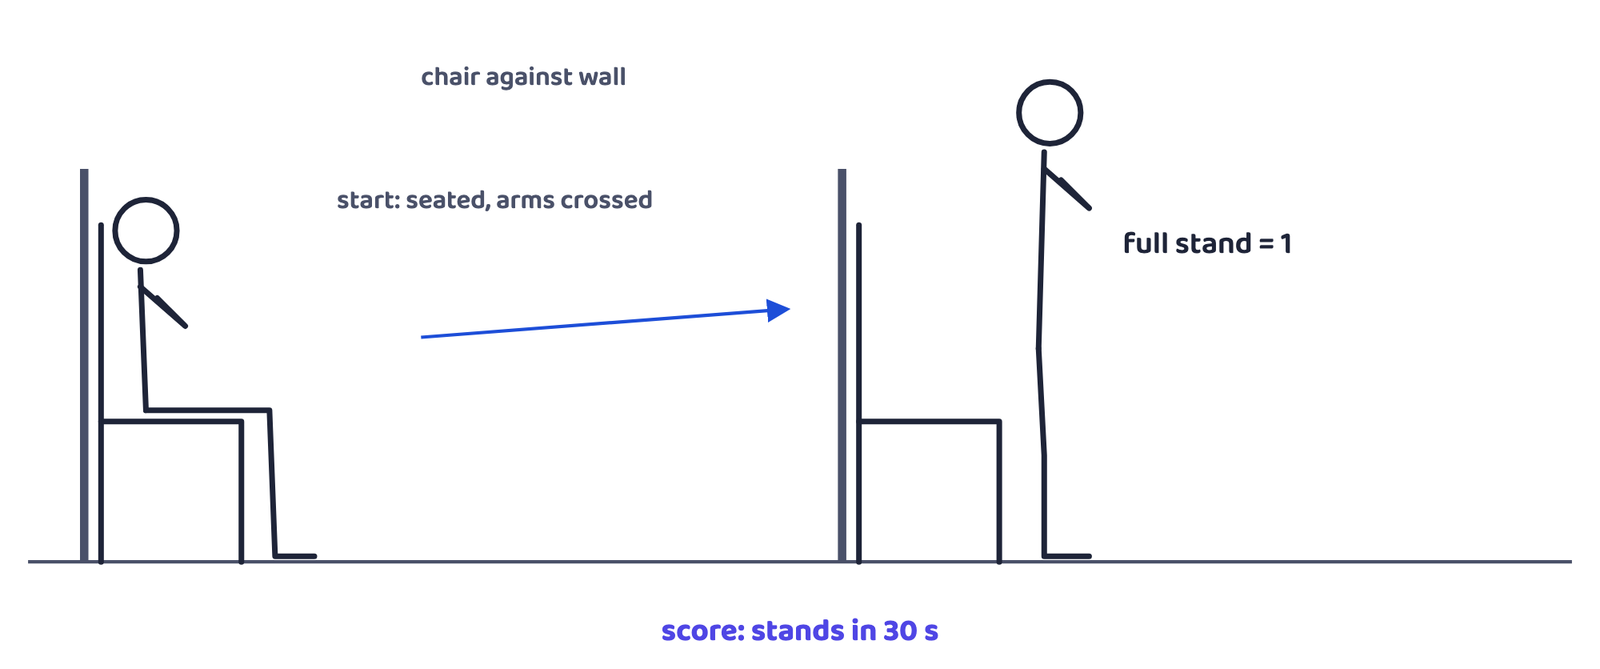
| Purpose | To determine lower body strength. |
|---|---|
| Objective | To complete the maximum number of stands in 30 seconds. |
| Equipment | Straight-back chair without arms; stopwatch. |
| Procedure |
|
| Scoring | Number of complete stands. If the person is halfway up when time runs out, it is counted as a full stand. |
7.2 Arm Curl Test
| Purpose | To determine upper body strength. |
|---|---|
| Objective | To complete the maximum number of arm curls in 30 seconds. |
| Equipment | Straight-back chair without arms; dumbbell: men 8 pounds (3.6 kg), women 5 pounds (2.3 kg); stopwatch. |
| Procedure |
|
| Scoring | Maximum number of correct arm curls in 30 seconds. |

7.3 Chair Sit and Reach Test
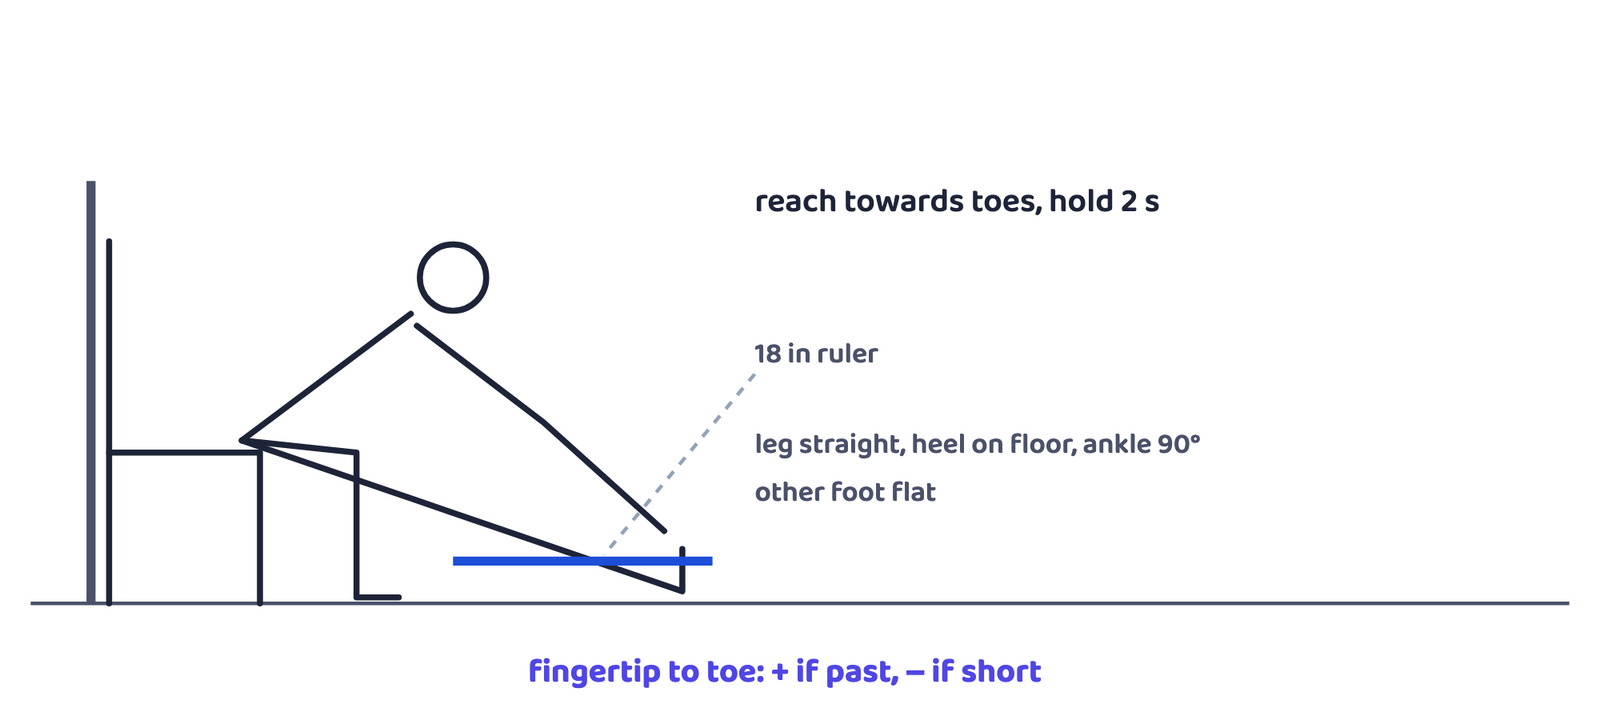
| Purpose | To determine lower body flexibility. |
|---|---|
| Objective | To stretch the lower body as far as possible. |
| Equipment | Straight-back chair without arms; 18-inch ruler. |
| Procedure |
|
| Scoring | Distance between the extended long finger and the tip of the toe, to the nearest 0.5 inch. If the fingers cross the toe, a + sign is written; if they cannot reach it, a − sign. |
7.4 Back Scratch Test
| Purpose | To determine upper body flexibility. |
|---|---|
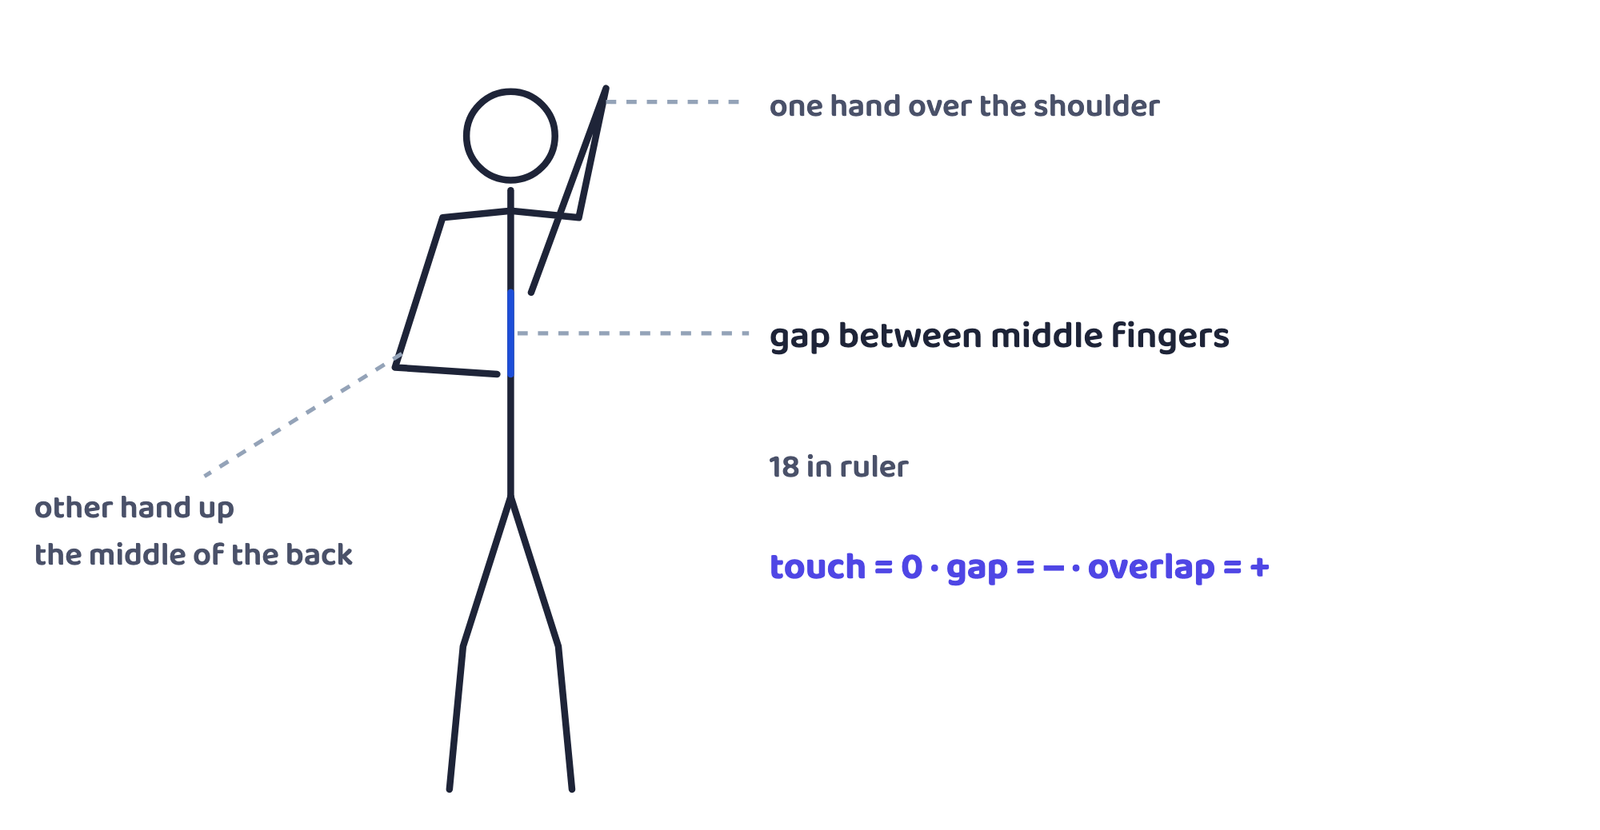
| Objective | To touch or overlap the fingers of both hands behind the back. |
| Equipment | 18-inch ruler. |
| Procedure | Standing, the participant places one hand over the shoulder and the other hand in the middle of the back, and tries to make them touch or overlap. |
| Scoring | Distance between the tips of the middle fingers. Touch = 0; a gap is a negative score; an overlap is a positive score. |
7.5 Eight Foot Up and Go Test
| Purpose | To determine physical mobility: power, speed, agility and balance (the book’s item list and the curriculum name it the test for agility). |
|---|---|
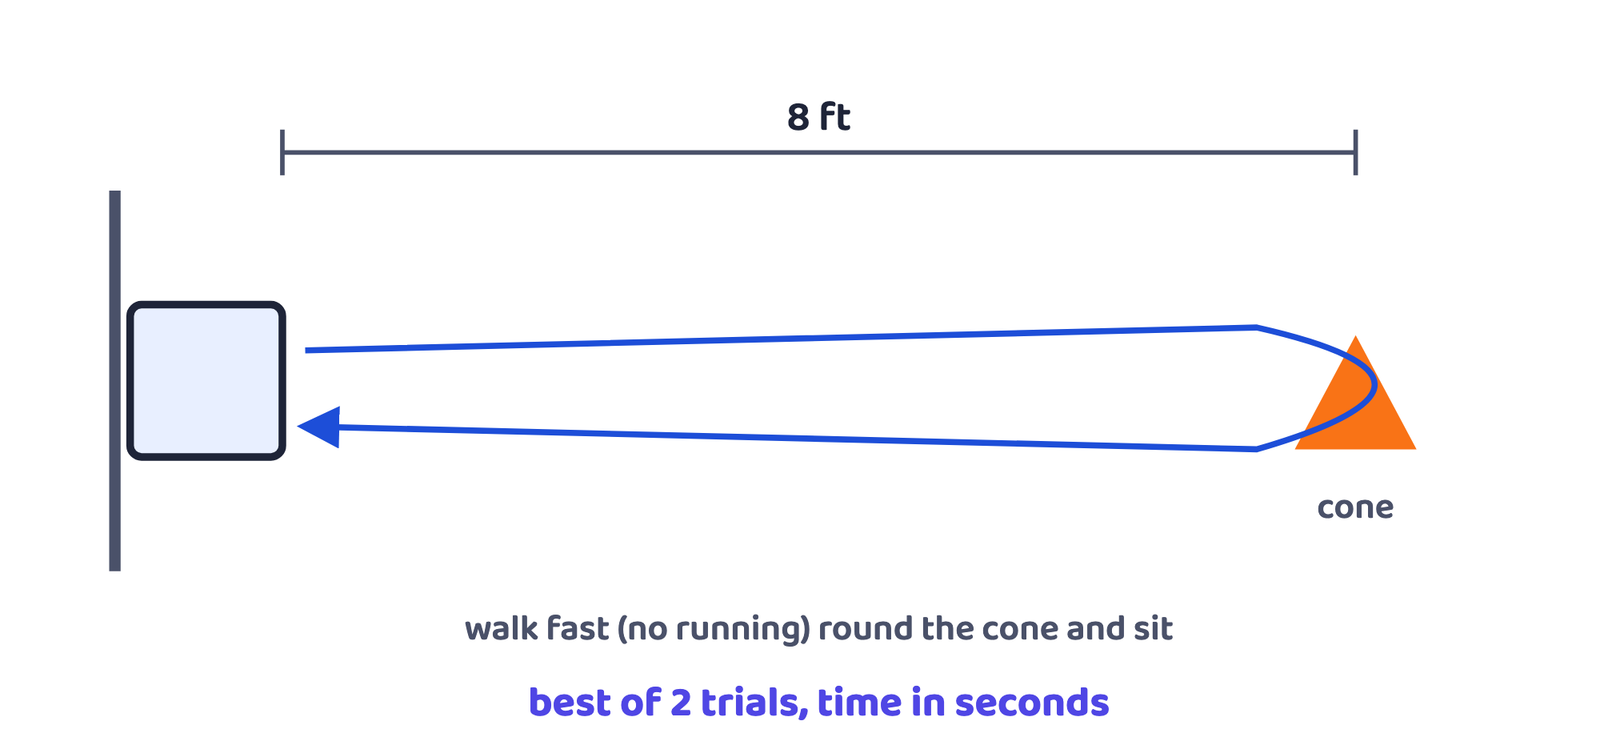
| Objective | To stand, walk 16 feet (8 feet out and 8 feet back) and sit back as fast as possible, without running. |
| Equipment | Straight-back chair without arms; cone; stopwatch. |
| Procedure |
|
| Scoring | Two attempts; the best (fastest) time between “Go” and return to the chair is recorded. |
7.6 Six Minute Walk Test
| Purpose | To determine aerobic endurance. |
|---|---|
| Objective | To walk the maximum distance in 6 minutes. |
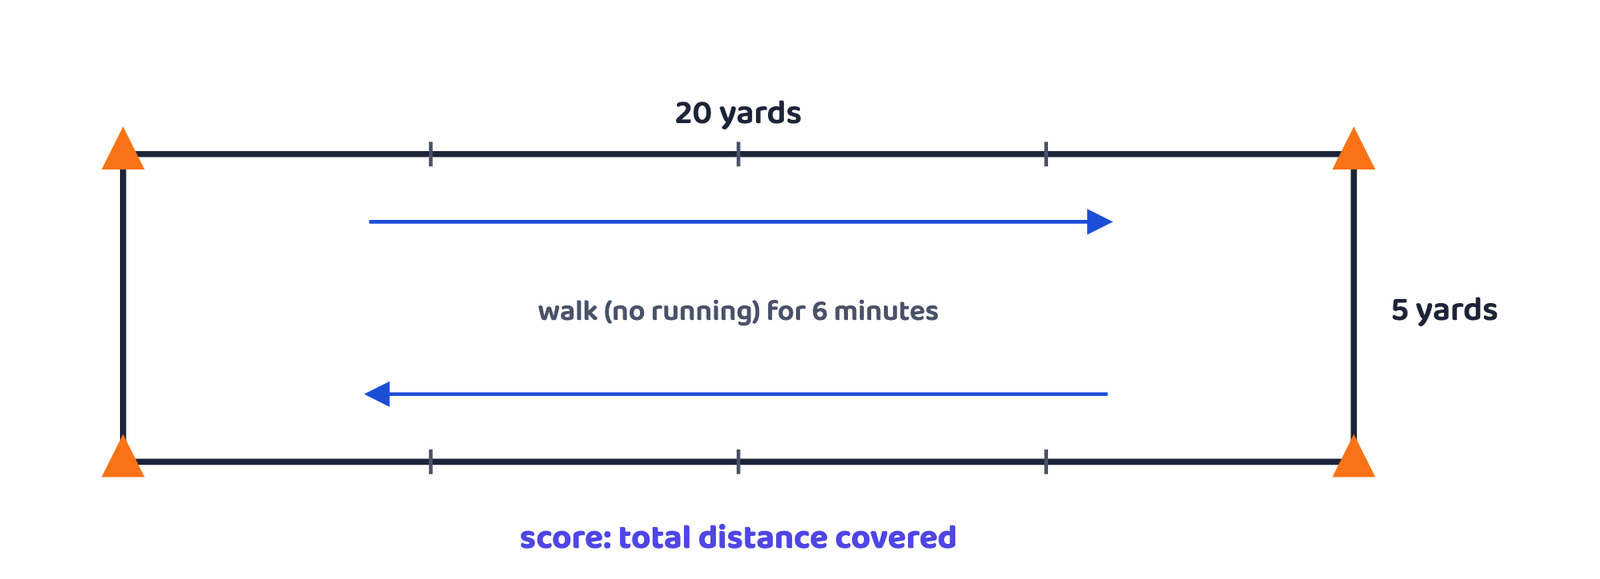
| Equipment | A walking area of 20 yards between parallel lines joined by 5-yard lines, making a rectangle; stopwatch; cones. |
| Procedure | On “Go”, the participant walks continuously around the course for 6 minutes, covering as much distance as possible without running. |
| Scoring | Maximum distance covered in 6 minutes. |
7.7 Two Minute Step Test (alternative)
| Purpose | To determine aerobic endurance. |
|---|---|
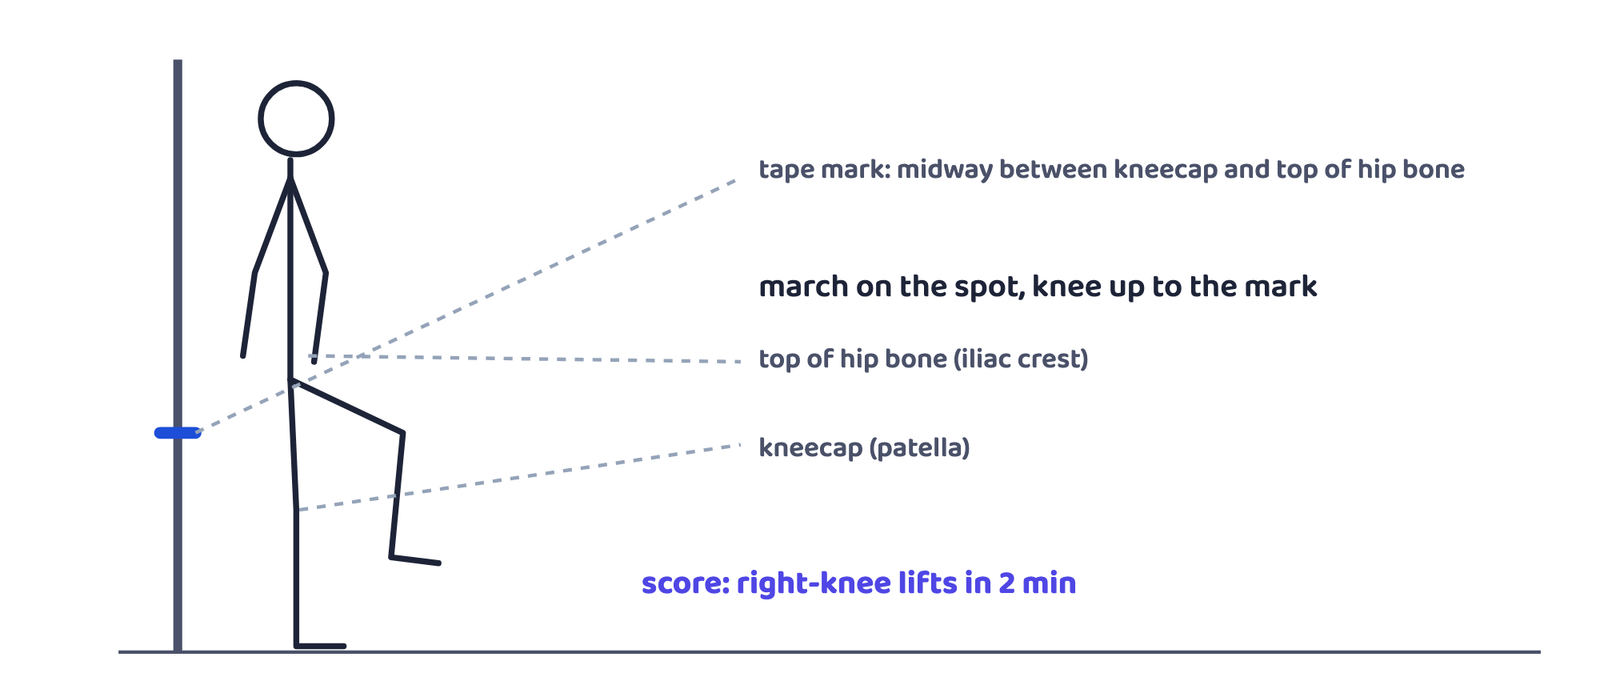
| Objective | To count the maximum number of steps in 2 minutes. It is used in place of the 6-minute walk test for people who use orthopaedic devices when walking, and for people who have difficulty balancing. |
| Equipment | Tape for marking the wall; stopwatch; wall. |
| Procedure |
|
| Scoring | The total number of times the right knee reaches the tape level in two minutes. |
7.8 Normal range of scores
The book prints these normal ranges (reference: The Journal for Active Aging, March-April 2003, p. 28). A score inside the range for one’s age group is normal.
| Men | 60-64 | 65-69 | 70-74 | 75-79 | 80-84 | 85-89 | 90-94 |
|---|---|---|---|---|---|---|---|
| Chair stand (no. of stands) | 14-19 | 12-18 | 12-17 | 11-17 | 10-15 | 8-14 | 7-12 |
| Arm curl (no. of reps) | 16-22 | 15-21 | 14-21 | 13-19 | 13-19 | 11-17 | 10-14 |
| 6-min walk (no. of yards) | 610-735 | 560-700 | 545-680 | 470-640 | 445-605 | 380-570 | 305-500 |
| 2-min step (no. of steps) | 87-115 | 86-116 | 80-110 | 73-109 | 71-103 | 59-91 | 52-86 |
| Chair sit and reach (inches +/−) | −2.5 to +4.0 | −3.0 to +3.0 | −3.5 to +2.5 | −4.0 to +2.0 | −5.5 to +1.5 | −5.5 to +0.5 | −6.5 to −0.5 |
| Back scratch (inches +/−) | −6.5 to +0.0 | −7.5 to −1.0 | −8.0 to −1.0 | −9.0 to −2.0 | −9.5 to −2.0 | −10.0 to −3.0 | −10.5 to −4.0 |
| 8-ft up and go (seconds) | 5.6-3.8 | 5.7-4.3 | 6.0-4.2 | 7.2-4.6 | 7.6-5.2 | 8.9-5.3 | 10.0-6.2 |
| Women | 60-64 | 65-69 | 70-74 | 75-79 | 80-84 | 85-89 | 90-94 |
|---|---|---|---|---|---|---|---|
| Chair stand (no. of stands) | 12-17 | 11-16 | 10-15 | 10-15 | 9-14 | 8-13 | 4-11 |
| Arm curl (no. of reps) | 13-19 | 12-18 | 12-17 | 11-17 | 10-16 | 10-15 | 8-13 |
| 6-min walk (no. of yards) | 545-660 | 500-635 | 480-615 | 430-585 | 385-540 | 340-510 | 275-440 |
| Chair sit and reach (inches +/−) | −0.5 to +5.0 | −0.5 to +4.5 | −1.0 to +4.0 | −1.5 to +3.5 | −2.0 to +3.0 | −2.5 to +2.5 | −4.5 to +1.0 |
| Back scratch (inches +/−) | −3.0 to +1.5 | −3.5 to +1.5 | −4.0 to +1.0 | −5.0 to +0.5 | −5.5 to +0.0 | −7.0 to −1.0 | −8.0 to −1.0 |
| 8-ft up and go (seconds) | 6.0-4.4 | 6.4-4.8 | 7.1-4.9 | 7.4-5.2 | 8.7-5.7 | 9.6-6.2 | 11.5-7.3 |
The women’s table in the book has no 2-minute step row. In the up-and-go row the larger number is written first, because a shorter time is better.
Q. A 72-year-old woman does 9 chair stands in 30 seconds. Is she in the normal range?
Women, 70-74: normal range = 10-15 stands. 9 is below 10, so she is below the normal range for lower body strength and should work on it.
For any fitness test, at any age, the test should be stopped at once if the person feels chest pain, dizziness, unusual breathlessness or pain.
7.9 How to improve each fitness component
| Component | Activities (from the book’s “Do you know” box) |
|---|---|
| Muscular strength | Jumps, throws, weight training |
| Muscular endurance | Pull-ups, push-ups, sit-ups, weight training |
| Cardiovascular endurance | Long-distance running, swimming, cycling |
| Flexibility | Yoga asanas |
| Speed | 10 m, 30 m, 50 m, 100 m sprints |
| Coordination | Ball throwing and catching, kicking and stopping a ball |
| Agility | Cone, ball, balloon and ladder drills |
8 Johnson-Metheny Test of Motor Educability
The Johnson-Metheny Test is a battery of four motor stunts that measures motor educability, that is, neuromuscular skill capacity. It is a revised version of the Johnson Educability Test.
In simple words, motor educability is how easily a person can learn new movement skills (our explanation; the book says neuromuscular skill capacity).
8.1 The test area (marked mat)
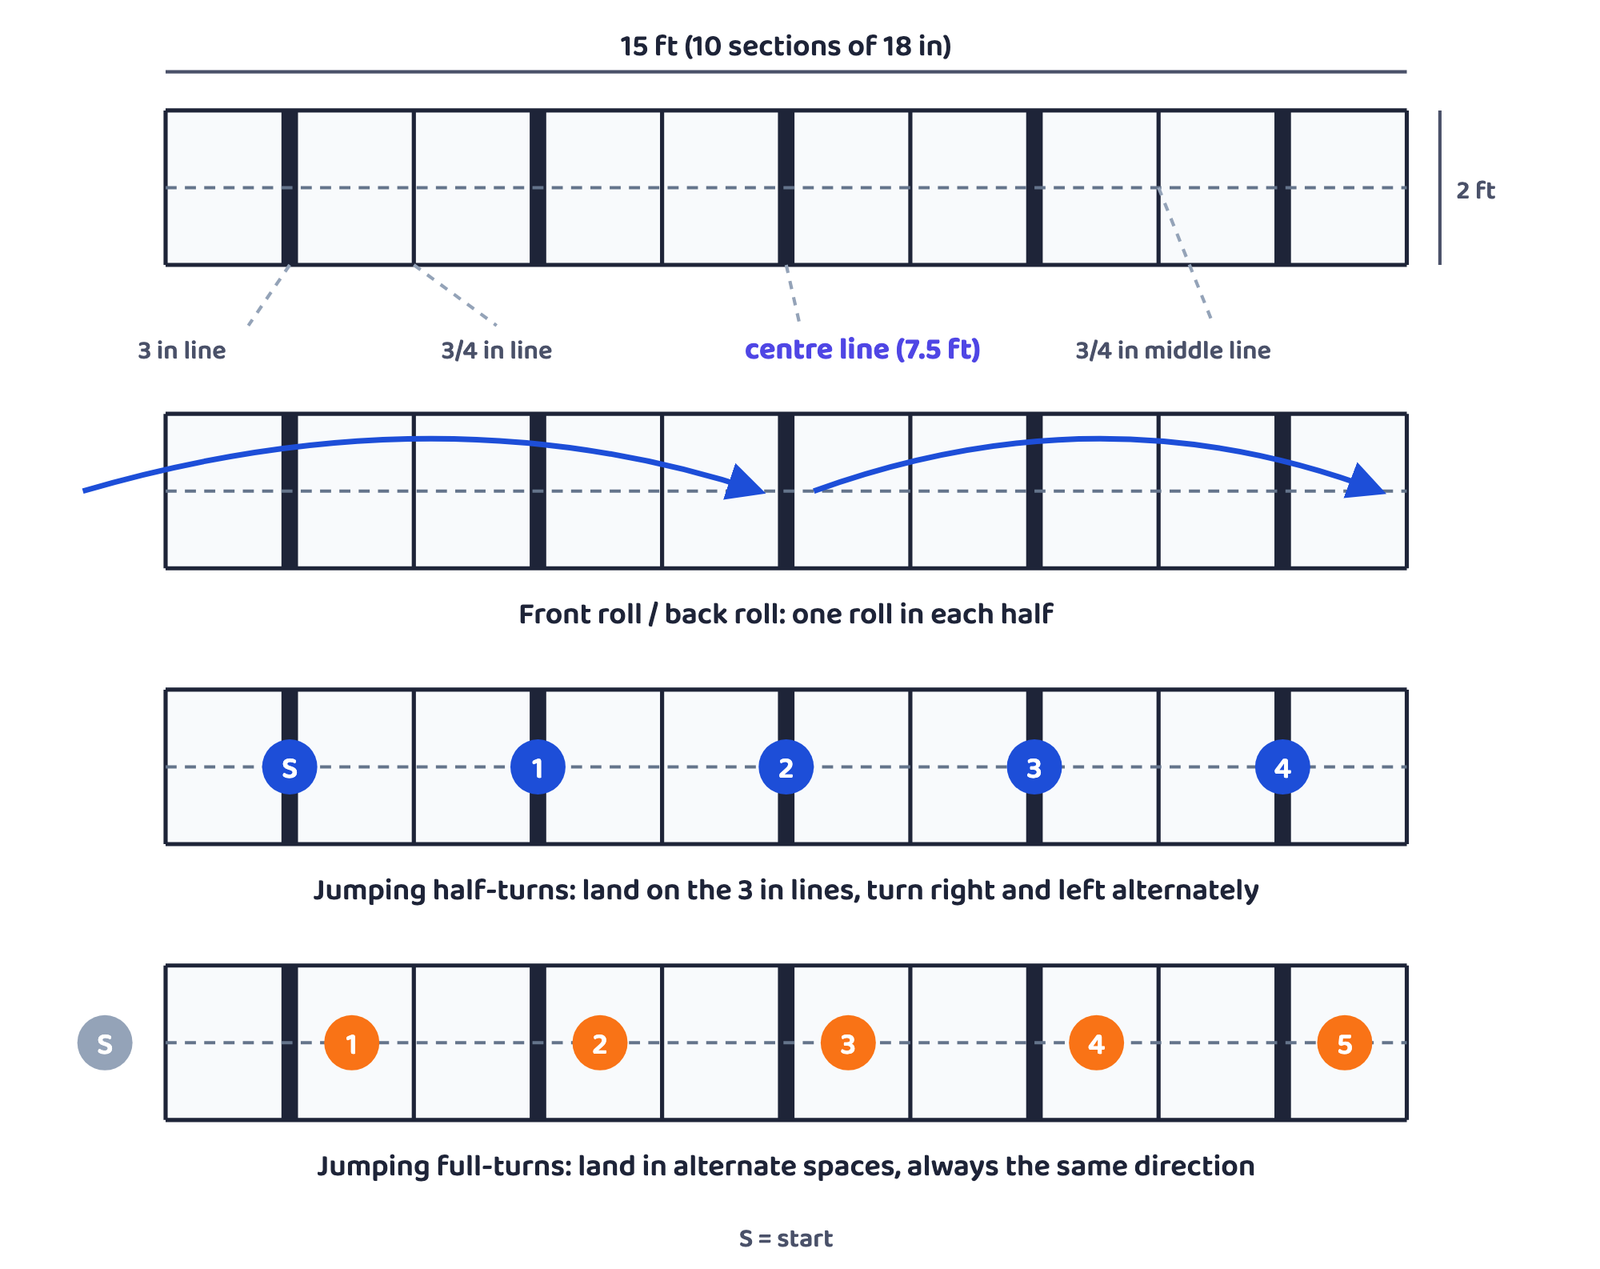
- Mat area: 15 feet long, 2 feet wide.
- The length is divided into ten sections of 18 inches each.
- The transverse (crosswise) lines are ¾ inch and 3 inches wide alternately; the centres of the lines are 18 inches apart.
- Another ¾-inch line runs lengthwise along the middle of the mat.
8.2 The four stunts
| Stunt | Procedure | Scoring |
|---|---|---|
| 1. Front roll | Ignoring the long middle line, the subject starts outside the marked area and performs two front rolls: the first up to 7.5 ft (the 3-inch centre line), the second in the other half of 7.5 ft, without touching the limits or over-reaching the zones. | Each correct roll = 5 points, maximum 10. Deduct 2 for over-reaching the side line (right or left) on each roll; 1 for over-reaching the end limit on each roll; all 5 if the subject fails to perform a true front roll. |
| 2. Back roll | Similar to the front roll in performing and scoring: start outside the marked area and perform two back rolls in the 2-foot lane, one in the first half and the second in the second half. | Same as the front roll: 5 per roll, maximum 10. |
| 3. Jumping half-turns | Start with the feet on the first 3-inch line; jump with both feet to the second 3-inch line, making a half turn to the right or left; jump to the third 3-inch line with a half turn in the opposite direction; continue to the 4th and 5th 3-inch lines, turning right and left alternately. | Perfect execution of four jumps = 10 points. Deduct 2 for each wrong jump (not landing with both feet on the 3-inch line, turning the wrong way, or both). |
| 4. Jumping full-turns | Start with the feet outside the marked area, at about the centre of the lane. Jump with feet together to the second rectangular space, making a full turn right or left; continue to alternate spaces across the mat, making full turns in the same direction, landing on both feet every time. | Perfect execution of five jumps = 10 points. Deduct 2 if the subject fails to keep balance on landing on both feet, turns too far or oversteps the squares. |
Jumping half-turns
- Land on the 3-inch lines
- Half turn, alternate directions (right, left, right, left)
- 4 jumps = 10 points
Jumping full-turns
- Land in the spaces (alternate rectangles)
- Full turn, same direction every time
- 5 jumps = 10 points
For a 5-mark question on this test, write: (1) the four items; (2) the mat (15 ft × 2 ft, ten 18-inch sections, ¾” and 3″ lines alternately); (3) the procedure of the stunt asked; (4) its scoring with the deductions. Each stunt is worth 10 points, so the four stunts give boys a maximum of 40 (girls, who do three stunts, 30).
- Test protocol = correct procedure; valid test = measures what it should; motor fitness = skill-related (agility, balance, coordination, power, reaction time, speed).
- Khelo India, class 1-3: BMI, plate tapping (coordination), flamingo balance (balance). Class 4-12: BMI, partial curl-up, push-ups / modified push-ups, sit and reach, 600 m run/walk, 50 m dash. BMI is common.
- BMI = W ÷ H² (kg, m). Plate tapping: discs 60 cm apart, 25 cycles, time. Flamingo: falls in 60 s; over 15 falls in first 30 s ends the test.
- Curl-up: strips 6 in apart, 30 s. Push-ups: elbows 90°, girls on knees. Sit and reach: feet at 23 cm mark, cm/mm. 600 m: endurance, walking allowed. 50 m: speed, dead start.
- Harvard Step Test: Brouha 1943; 20-inch bench, 30 steps/min, 5 min; FI = seconds × 100 ÷ (5.5 × pulse 1-1½ min); up to 49 poor, 50-80 average, 81+ good.
- BMR (Kcal) by Mifflin-St Jeor: 10W + 6.25H(cm) − 5A, then +5 men, −161 women.
- Rikli and Jones (60-94 yrs): chair stand (lower body strength), arm curl 8 lb / 5 lb (upper body strength), chair sit and reach (lower body flexibility), back scratch (upper body flexibility), 8-ft up and go (agility), 6-min walk (aerobic endurance); 2-min step is the alternative.
- Johnson-Metheny: 1932 Johnson (10 items), 1938 Metheny (removed 6); front roll, back roll, jumping half-turns (4 jumps, on 3″ lines, alternate), jumping full-turns (5 jumps, alternate spaces, same direction); 10 points each.
- Can I name the test items for classes 1-3 and 4-12, and the component each one measures?
- Can I write purpose, equipment, procedure and scoring for any one test without mixing it with another?
- Can I calculate BMI, the Harvard fitness index (and rate it) and BMR for a boy and a girl?
- Can I match each Rikli and Jones item to what it measures, and draw the Johnson-Metheny mat?